Here we detail our vans conversion process including the accessories and specification we opted to put in the van. The thought process behind some of our requests and the decision making process behind these ideas.


Base van bought, it was now time to start looking to get the van converted as quickly as possible so we could get as much use out of it during the Summer.
With a newborn baby, it was unlikely we were going to do many trips abroad this year so getting the van converted as quickly as possible was vital to our holiday plans for the Summer so we could travel the UK.
“We were hugely impressed with the professionalism, finish and workmanship on offer at Go Explore Campers, Hendy, Swansea.”
The Conversion Process
Once we had found our panel van and placed a deposit on it, we immediately made some visits to some local conversion companies. We visited every conversion company in a thirty mile radius.
After seeing them all, we were hugely impressed with the professionalism, finish and workmanship on offer at Go Explore Campers, Hendy, Swansea.
The staff spent a great deal of time with us planning in great detail our design, materials, colours, accessories and features. We were impressed that we weren't being forced or directed towards expensive products and upgrades, we were given simple and honest advice about some of the upgrades we were considering, many of which resulted in us spending less money than we would have originally thought. Sometimes, honesty and genuine advice is worth so much!
So what did we decide to have done to the van? It's easier to split the conversion into Interior and Exterior.
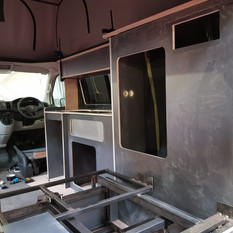
Interior Conversion
We had a swivel base fitted to the front bench seat and had all the seats re-upholstered in black leather to match with an Olympic Blue VW logo stitched into each of the headrests.
The side of the van was stripped, carpet lined and insulated and had LED lighting installed. A lights switch was installed to control the LED interior lights in the rear of the van. We also had a new ply floor installed with Dark Grey hardwearing Altro flooring.
The plastic rear threshold and the side step into the van were replaced with new.
We eventually decided on fitting an M1 Tested 3/4 Rock 'n' Roll bed in the rear of the van. These were upholstered to match the seats in the front of the van.


In terms of electrics, we had a Leisure battery installed in the rear of the van. This had a split charge system in order to trickle charge the leisure battery whilst driving. We had a PMS3 Power Management System installed. In order to power and charge devices in the van, we had a single 240V Socket installed and also a double USB power socket.
I terms of the kitchen and storage, we had a Waeko CRX50 fridge/freezer installed. We decided on Carbon design units for a kitchen area and storage which included overhead lockers, a table which could be stored securely behind the drivers seat. We had a black sparkle splash back to the units.
All of the storage cupboards had grey tambour doors and the units were finished with a silver trim.There was a storage section underneath the Rock 'n Roll bed and at the rear of the van was storage areas for a gas bottle and water container.


The Gas and water were to supply the Dometic Hob and sink that were installed. The gas and water were plumbed in.
There was a roof bed installed which was put on gas strut so it could be raised in order to enable you to stand up inside the van when using the kitchen.
All of the windows had blackout Curtains installed to ensure we could sleep well at night.
Exterior Conversion
We had a Skyline Pop-Top roof painted Black with bed fitted which we felt would accentuate the white body colour of the van. We had the roof canvas in grey.


We decided to fit a Sportline front bumper and also had a rear spoiler fitted. We also had the VW front badge and part of the front grille painted Olympic Blue as well as the front splitter.


We had a rear tailgate window fitted as well as mid and rear black tinted side windows on both sides to get plenty of light into the van. The mid window near the kitchen area of the van ad a sliding window installed for ventilation when cooking.


We had an External Electric Mains Hook Up fitted underneath the rear bumper.
The van was completed quickly, within around five weeks, and we were regularly sent pictures of it as it was being converted and were invited down to see the progress. Every time there was a decision to be made we were consulted.
We finally collected the van on 1st May 2019 and the first part of our journey was complete.
We now had the perfect Campervan to start our Adventures!


No comments:
Post a Comment